Set up your computer, shape a useful project, and deploy your first harness build.
Build a small project you would actually use: a personal tracker, a searchable collection, a generator, or a prototype of a larger idea. Choose something you can finish. Save your most ambitious long-term project for the next phase.
Bring your progress with you
Open your harness on a computer, or use an already reliable remote connection. Copy the Phase 2 handoff below into your agent, then attach your Phase 1 progress file if you have one. If you saved your progress as text, paste that too. If you have neither, tell the agent what you completed so it can rebuild the record with you.
Start with your existing local or portable progress. You can begin Computer Setup before a progress repository exists. Your agent preserves that record while it prepares the tools; this website does not store your completion state.
Your companion supplies a compact handoff with what worked, any remaining blocker, the computer harness you chose, and one next action. You do not need to repeat questions you already answered or declined. An existing repository is inspected and merged, not replaced with a blank template.
Google users: bring this handoff and your saved progress into Antigravity on your computer, or into an existing Antigravity session through its browser connection. Carry your progress over rather than assuming your companion's conversation has transferred.
Phase 2 handoffCOPY + PASTE
Paste into your computer agent. Attach your saved progress before sending.
On iPhone, touch and hold the text, then choose Copy. Use Select All if needed.
Complete Computer Setup
Tell your agent: Run Starter Pack Computer Setup. It reads the Computer Setup instructions from the handoff and inspects your operating system and installed tools before proposing changes. Windows 11 and current macOS are first-class paths; Linux support is best effort.
Your agent presents one plain-English plan for the required tools and asks for batch approval. Existing working tools count. It pauses when you need to sign in, approve administrator access, or restart, and saves enough nonsecret state to resume. Optional tools are separate choices. Docker Desktop is only for projects that need containers and is installed last.
The baseline includes a harness, an IDE, Git and GitHub CLI, Node LTS, Python with uv, search and JSON utilities, and Tailscale. You do not need to memorize these names or install every framework globally. Your agent checks the current requirements, reuses healthy tools, and verifies commands in new terminals, the editor, and the harness itself. A command working in one open terminal does not prove the agent can run it.
Your agent installs and configures Antigravity IDE for Antigravity, Cursor for Cursor users, and VS Code for every other route, including ChatGPT/Codex and Claude Code. This is part of Computer Setup's approved installation batch. Existing working installations and settings are preserved.
Your agent does the building. Your editor lets you look at the files and change them yourself - I use mine for Markdown plans and notes all the time. Keep working in your chosen agent platform; you do not need an extra editor when Cursor already provides both roles.
Optional: try a programmatic harness with Codex
After required Computer Setup outcomes are complete, Codex users can choose an optional local programmatic-harness proof. It checks whether a small program can start Codex, make two turns in one local session, and confirm the result. This is a learning experiment, not a Phase 2 requirement. You can decline, defer it, or stop after a failure and continue to Quick Build.
What you will see: Codex creates proof.txt with hello world, and the program checks its exact contents. The connection closes; a fresh connection resumes the same Codex session and changes that same file to hello Codex. The program checks the new contents and reports whether cleanup worked. We verified both checks for the released workflow. It makes session continuity visible without asking you to build a larger automation first; it does not establish that the whole curriculum runs unattended.
This route uses Codex's managed ChatGPT sign-in and an eligible ChatGPT plan. It does not require OpenAI Platform API billing or an API key. The adapter and reusable skill are separate released tools; your agent checks their pinned releases before offering the workflow and installs them only after you opt in. For technical details, browse the Agent Native documentation (opens in a new tab), including its programmatic-harness overview and Codex adapter guide.
To opt in, tell your agent: I want to try the optional local Codex programmatic-harness proof. It verifies the pinned skills installer and installs the reusable skill into the selected Codex project. The opt-in covers that documented skill install; the skill handles any separate approval needed for the proof's project changes. Cloud usage is a separate choice and is not part of this local proof. If you decline or defer, Computer Setup hands off directly to Quick Build.
Your agent reuses the Codex readiness checkpoint at Computer Setup, Quick Build, and release handoffs. It checks again only when the actual computer, workspace, runtime, permission, or sign-in context materially changes. A decline stays recorded, and a deferred check returns only when its blocker changes or you ask.
See your progress on your computer
At the start of setup, your agent prepares a Progress Workbench beside your progress file. As soon as Python is ready, it opens a local view of your phases, setup results, and next action. Your files stay on your computer; this website does not host a personal dashboard. If you already customized your Workbench, the agent preserves it.
The Workbench is your default way to see the record, not another completion requirement. Setup can continue if you decline the viewer or it needs repair. Early on, your agent offers to remember still-unaddressed email choices for development accounts and notifications. They can be the same with your confirmation, or you can decline. The agent preserves previous answers and sign-in notes without inferring an email or changing your Git identity.
Save progress to your private repository
As soon as GitHub access is ready, your agent creates or confirms a private GitHub progress repository and saves your existing progress and setup results there. If Git or GitHub CLI is missing, Computer Setup installs it and guides you through sign-in first. Keep a local or portable copy through any interruptions. Before Quick Build begins, the agent must confirm that the repository is private and your progress has reached GitHub.
When a service offers its own login or approval flow, use that. You should not have to make a credentials file on your phone just to sign in. Your agent checks the intended Git author and privacy settings before the first useful save and asks before any repository-local identity change.
Publishing a protected Workbench is an optional later project. Give your instant app's deployment extra credit priority if you want to put something online now. The local Workbench works independently of GitHub and does not need a hosted copy.
Connect and exchange a file
Install and sign in to Tailscale on your computer and phone. Remote control lets you direct the agent. Tailscale also gives your phone and computer a private way to exchange files and reach local tools. Your agent checks both devices and their private network identity separately from the harness connection.
Your agent uses the file-transfer guide to help you send a harmless file from your phone, locate and read it on the computer, then open a returned result on your phone. The actual received location depends on your client; do not assume a Downloads path. A received ZIP is not permission to execute or extract its contents. If one direction fails, keep the successful result and fix only the missing direction.
You also need a way to control the harness: a browser connection, a harness-native remote client, a suitable remote desktop, or SSH.
Antigravity users: follow the Remote Control setup (opens in a new tab), then open the dashboard (opens in a new tab) in your phone's browser. Use the same Google account as the computer instance, select that computer, and send a message in its agent session. The computer must be awake and connected. Your agent checks Tailscale separately; Antigravity's dashboard handles its own connection.
For a connection over Tailscale, use the computer's Tailscale/MagicDNS name. In either case, complete one harmless action in the actual computer harness session and tell your agent what worked. A phone chatbot login is not harness control, and a working harness message is not proof of the file round trip. Your agent records those results separately, reuses successful checks, and keeps the exact recovery step if something fails. Before Quick Build, it checks the required setup outcomes and verifies that progress is saved privately.
Design and create your project
Once Computer Setup is complete, shift from preparing your tools to shaping the project you want to make. Choose a small idea you care about, describe the useful result, and let Quick Build turn that starting point into a plan your agent can build.
The next example shows how a personal interest can become a focused project.
Built by Devin / The project behind this phase
Daily Combo Trials
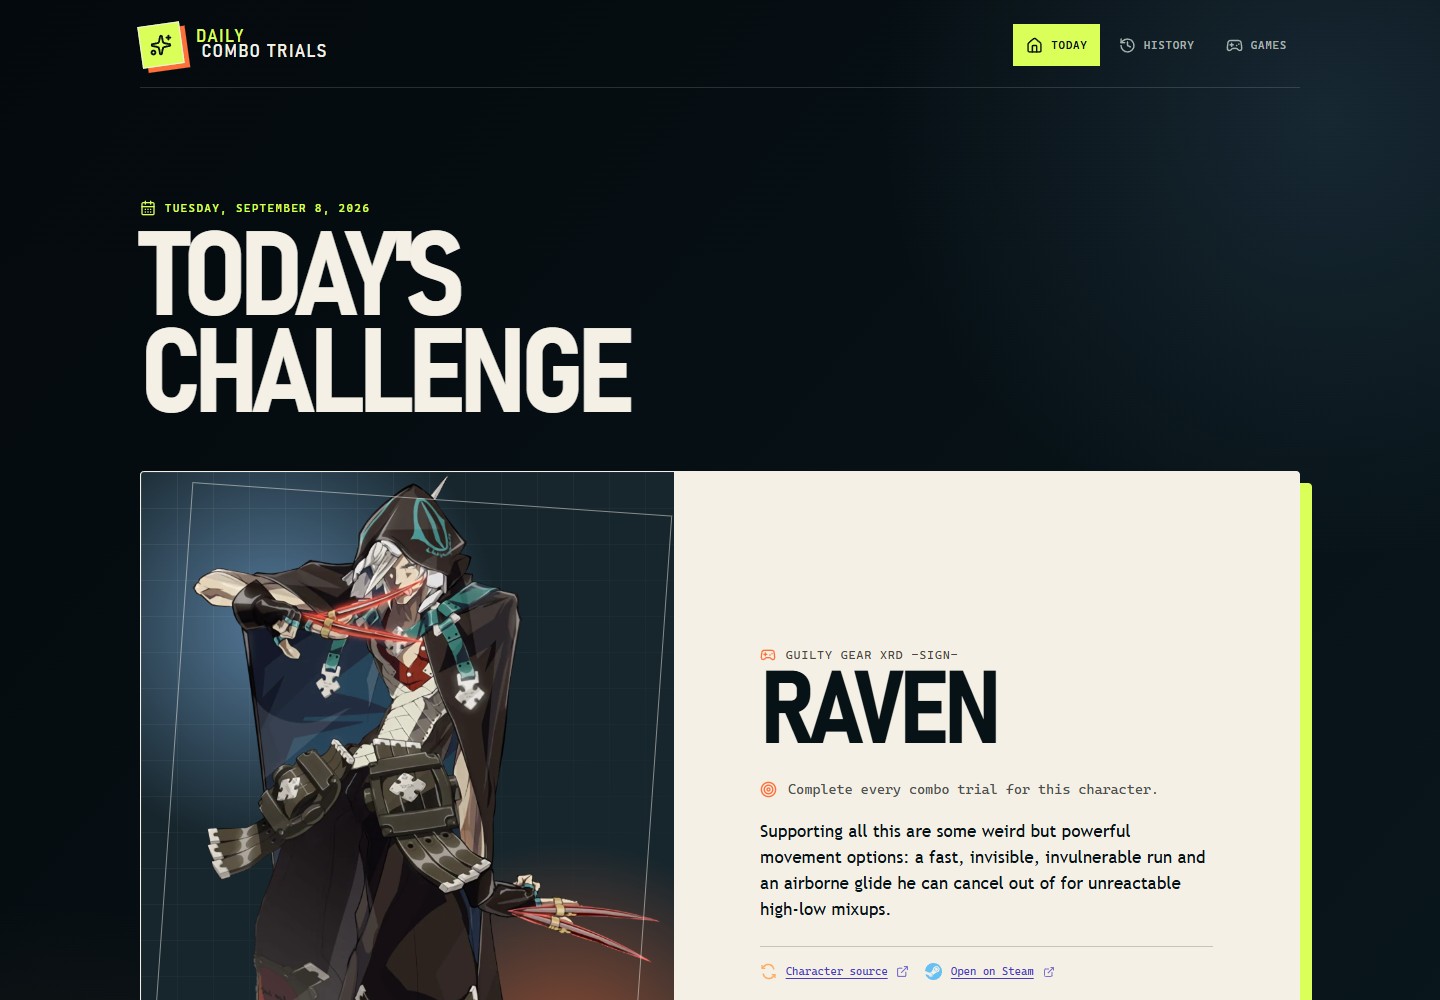
I turned my fighting-game collection into a daily reason to practice: a game, a character, and a combo-trial challenge. Visit the working site, then follow the decisions about selection, scope, and saved history in this phase.
The live daily challenge, captured September 8, 2026.
From my projects · Daily Combo Trials
An interest is enough of a starting point
I wanted a useful reason to revisit fighting games. The idea behind Daily Combo Trials was simple: pick a game, pick a character, and give me a combo-trial challenge. I already cared about the collection. The useful thing to build was a way to make one decision from it.
Steam API data was part of how I started. An API is a way for software to request information or actions from another service. An exported library and a curated set of games became a catalog that I could keep with the project. The app did not need to sign everyone into Steam or continually synchronize their accounts to make that catalog useful. I could review the starting material, choose what belonged, and build around it.
Try it in your project
Find one question in your collection
For your project, look at information you already keep: a reading list, practice notes, a collection, or equipment you own. Pick one question you repeatedly ask of it. "What should I practice today?" is a much clearer starting point than "Build me a platform for my hobby."
Before connecting a service, ask whether a permitted export or a small, reviewed sample would be enough. A snapshot fits a collection that changes occasionally. Current availability or each person's live account data would be a different promise and would need a different plan.
Tell your agent: "Here is a collection I care about. Help me choose one useful question it could answer. Identify the few fields we need and whether a reviewed snapshot is enough for the first version."
Have a short design conversation
Another project idea: a personal portfolio.devthomas.site (opens in a new tab) grew out of my desire to track my Udacity certifications. A small collection of your credentials or work, with a useful way to browse or filter it, can make a good Phase 2 build. Start with what you want to keep track of; it can grow into something you share with employers.
Once Computer Setup is complete and your progress is saved to the private GitHub repository, tell your agent: Run Quick Build for my idea. It will ask one compact round about what you want to make, who it is for, the main actions, your existing content, what to leave out, how it should feel, and what would count as done. Answer conversationally; you can leave routine technical choices to the agent.
Your agent reads the Quick Build instructions from the handoff and turns that conversation into a plan, a specification, decisions, and ordered build tasks. It creates and maintains those files. Ask to see them whenever useful; your next action is to review the agent's summary of the intended result, then say go or request a revision.
The Quick Build skill and templates arrive before you need them; learning skill installation and orchestration can wait. If your tool acts on your own creative work, the plan starts with your content and the controls you need, not unrelated demo content or autoplay. Your agent also records consequential repairs privately so you can resume without repeating the same troubleshooting.
From my projects · Daily Combo Trials
Explain what a good result means
"Pick a character" leaves a surprising amount undecided. In Daily Combo Trials, the rule is to choose a game first, then a character from that game. Choosing from one giant list of characters would give games with larger rosters more chances to appear. Both approaches can produce a random character; they express different ideas about the daily choice.
I also kept the shared daily challenge separate from a visitor's reroll. Someone can ask for another suggestion without changing what everyone else sees for the day. Those are small sentences, but they determine what the buttons should do and what the agent should verify.
My original project used three discovery rounds. Quick Build gives you one compact round for this phase; the example shows the kinds of decisions to make, without asking you to repeat my entire process.
Try it in your project
Describe the results you expect
Try writing two or three examples before approving your build. Describe an ordinary result, something that should stay unchanged, and an outcome that would feel wrong. You do not need to name an algorithm. Your job is to explain the behavior well enough that you can recognize it when you try the app.
Ask your agent: "Write the main rule in plain language. Show me one normal example and one surprising edge case. Turn the rule into checks I can understand."
Build and put it online
Once you approve, the agent implements the smallest complete version in a durable project repository. Cloudflare is the default deployment platform. Vercel is an optional alternative when suitable. Neon comes into the build only if the project needs persistent relational data. Accounts, payments, and integrations are added only when they serve the product you approved.
Review the main behavior yourself and tell the agent what needs changing. Verification should fit the project and your testing preferences. Then deploy the project and open its live URL. A successful local build alone does not show that a deployed app works: try the main action at that live URL.
The agent records build success, layout checks, deployment availability, and real behavior separately. If a promise depends on your actual phone - such as background audio - try it there. A desktop screenshot does not prove it. Your clear report counts as evidence; an unperformed check stays visible as pending.
From my projects · Daily Combo Trials
Decide what has to survive
I used different storage for different promises. The catalog lives with the project. Daily assignments are stored so that an old recommendation stays the same even after the catalog changes. A visitor's reroll is temporary browser state. Accounts and completion tracking were outside the scope of this build.
Try it in your project
Check what your app will remember
That distinction gives you a useful review exercise. List the information in your app, then ask who needs to see it and how long it must last. A temporary choice, shared history, and a person's saved progress are different requirements. Tell your agent which one you mean before it chooses storage.
My project used Python and deployed on Vercel, with Supabase storing production history. Your build can use Starter Pack's defaults and still apply these decisions. The question to carry forward is what your product must remember. Once it is online, check that the live version keeps that promise.
Ask your agent: "What will survive a refresh, another device, or a new deployment? Show me how we will verify the parts my app promises to remember at its live URL."
Finish with something you can return to
Your agent checks the required steps, saves your place, and tells you when Phase 2 is complete. It checks after the last result, at session close, and when you return. Your finish line includes a meaningful working project, durable source, verified live behavior, and a confirmed final private save - not just the earlier repository setup.
If the final save fails, your local accomplishments stay intact and the agent identifies the outstanding save. It does not claim your progress reached GitHub or restart the build. Completed history keeps its requirements revision, and optional email or Workbench work does not become a graduation gate.
Once completion is confirmed, choose whether to stop or look ahead to Build something great. Your agent offers the preview without enrolling you automatically.
Files for your agent
Your agent follows these files from the prompt. If it asks for an address, copy one here. On iPhone, you can also touch and hold the address to select and copy it.
Phase guide for your agent
On iPhone, touch and hold the text, then choose Copy. Use Select All if needed.
Paste into your agent.
Phase data
On iPhone, touch and hold the text, then choose Copy. Use Select All if needed.
Paste into your agent.
Computer Setup instructions
On iPhone, touch and hold the text, then choose Copy. Use Select All if needed.
Paste into your agent.
Quick Build instructions
On iPhone, touch and hold the text, then choose Copy. Use Select All if needed.